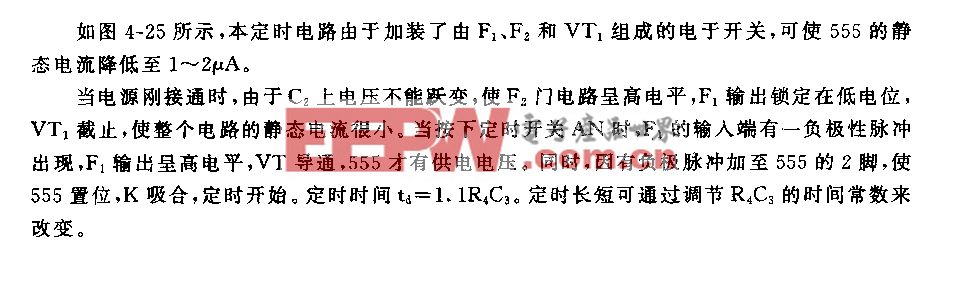
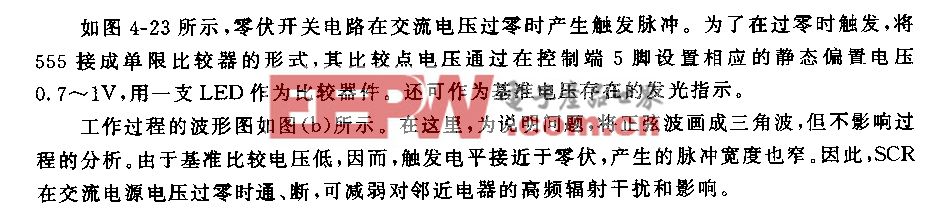
Controlling an SPI device with the Raspberry Pi

The Raspberry Pi has a Broadcom BCM 2835 chip allowing it to interface with SPI devices on its GPIO pins. There are two chip select pins meaning that the Pi can control two devices simultaneously.
| 19 | MOSI – master output slave input |
| 21 | MISO – master input slave output |
| 23 | SCLK – clock |
| 24 | CE0 – chip enable 0 |
| 26 | CE1 – chip enable 1 |
Step 1: Enable SPI on the Raspberry Pi
In your Pi’s terminal, run
sudo raspi-config
Go to Advanced Options > SPI
Choose “Yes” for both questions then select Finish to exit raspi-config
Either reboot your Pi or run this command to load the kernel module
sudo modprobe spi-bcm2708
Step 2: Install spidev
Spidev is a python module that allows us to interface with the Pi’s SPI bus.Watch movie online The Transporter Refueled (2015)
sudo apt-get update
sudo apt-get upgrade
sudo apt-get install python-dev python3-dev
cd ~git clone https://github.com/doceme/py-spidev.gitcd py-spidev
make
sudo make install
Step 3: Python script
Finally, we can write and run a python script to control the SPI device.
Create a file called spi-test.py in your favorite editor
#!/usr/bin/pythonimport spidevimport time

spi = spidev.SpiDev()spi.open(0, 0)spi.max_speed_hz = 7629# Split an integer input into a two byte array to send via SPIdef write_pot(input):
    msb = input >> 8
    lsb = input & 0xFF
    spi.xfer([msb, lsb])# Repeatedly switch a MCP4151 digital pot off then onwhile True:
    write_pot(0x1FF)
    time.sleep(0.5)
    write_pot(0x00)
    time.sleep(0.5)
Make the file executable and run it
chmod +x spi-test.py
sudo ./spi-test.py
Notes on spidev
Unless the spi.max_speed_hz field is a value accepted by the driver, the script will fail when you run it. The field can be set to these values on the raspberry pi:
| 125.0 MHz | 125000000 |
| 62.5 MHz | 62500000 |
| 31.2 MHz | 31200000 |
| 15.6 MHz | 15600000 |
| 7.8 MHz | 7800000 |
| 3.9 MHz | 3900000 |
| 1953 kHz | 1953000 |
| 976 kHz | 976000 |
| 488 kHz | 488000 |
| 244 kHz | 244000 |
| 122 kHz | 122000 |
| 61 kHz | 61000 |
| 30.5 kHz | 30500 |
| 15.2 kHz | 15200 |
| 7629 Hz | 7629 |
Two SPI devices can be controlled in python by creating two SpiDev objects, one for each device.
spi = spidev.SpiDev()
spi.open(0, 0)
spi.max_speed_hz = 976000
spi2 = spidev.SpiDev()
spi2.open(0, 1)
spi2.max_speed_hz = 976000
https://www.takaitra.com/spi-device-raspberry-pi/
*博客內容為網友個人發布,僅代表博主個人觀點,如有侵權請聯系工作人員刪除。